Sunday, December 30, 2012

Tempus Fugit

I can believe that it has been so long between posts!!  Time really does FLY!  It's been all work and no play, but now that the long holdays are upon us, PLAY is high on the agenda.

I know it's a little late for Halloween but I thought I'd put this up as I had a lot of fun making it.  This is made with one of the Configurations box sets and with bits and pieces that I've bought over the past few years from various places such as Inspiration Emporium, Alpha stamps and other online craft outlets.

I had a great time working out what I'd put in the various bottles and came up with the idea of making some fun and 'naughty' things out of FIMO.  I have't used this stuff for a long time and I'd forgotten how much detail you can add to it.  Worms, rats tails, oranges, the green apple and the pickled men's 'bits' (no I wasn't mad at the hubby, just thought it would be fun!) are all made out of FIMO.

The wine bottles, kettle and the hen are all dolls house miniatures that I picked up at the local hobby shop called Stainbridges. (I alway blow my pay packet here!!)


Here are some close ups of the different sections.


I can't remember how I made the blood, but it worked out well and because I have put some wax on the cork lid, it hasn't evaporated. 
(I have found that if you cover the cork stoppers with wax it prevents evaporation and inhibits mould from forming in the water.)


Skulls and Kettle
Pickled Worms


I have a close up of the picked mens 'bits'  but if you feel this may offend, please go no further!!

Happy Crafting.

Sonia


Pickled Mens 'Bits'

Saturday, April 30, 2011

Holiday Craft Fun!!


Thank goodness for holidays!!!


Going back to full time work has meant that my creative pursuits have been on the back burner for the past ten weeks.


For the past week during the holidays I have had some 'me' time and have been playing for a couple of days with some new ideas and techniques.


Here are some of the ATCs I have completed.


'Fish' has been done using the Watercolour Background technique I learnt in Kelsey's class last week. The stamps are from Fred Mullet, which I have highlighted with some Twinkling H2Os. Unfortunately these photos do not show the iridescent quality to the paints. For some 'bling' I have added some rhinestones to represent bubbles.


'Turn over a new Leaf' is also done with the Watercolour technique, but I have also used another water colour technique on the stamp to highlight the leaf. I have once again used the Twinkling H2Os to add some highlights to the teal coloured areas.


'Beauty' has been done on a tissue paper background whihc has then been sprayed with bronze Glimmer Mist.

The picture is attached with small screw brads, with pearl and German Scrap embelishments added as highlights.


'Free Soul' is on a metallic background with the stamp from Beeswax stamps.

The picture is pretty dark, but links beautifully with the stamp.


Happy Crafting!!


Sonia :-)

Sunday, February 20, 2011

It's been a while!!

I haven't had the chance to do a post for a while due to holidays, house renovations and going back to work. This has severely cramped my art time, but hopefully I can now get some balance back and spend some time creating.
These two ATC's were done using acetate which has been put through the Cuttlebug to create the patterns on the corners and sides of the ATC. The impression left by the cuttlebug has been coloured using a gel pen and glitter glue. I have used two of my favourite stamps from Stampers Anonymous.


'Gone Fishing'
The background has been done with the shaving foam marbling technique and then the images, cut-outs from the cuttlebug and clear dots have been added. I have gone around the clear dots with a fine gold pen to highlight them. I have then raided my husbands fishing box for the hook and line and then added the Greman scrap.


I have started going to Kelsey's classes for Technique Book Five.

The cover was done using altered CD's. This is a fabulous technique, especially since you can use a variety of products to colour the CD's which still allow the iridescent background colours through.


Last Tuesday's class was working with metal. This thin, malleable metal can be run through the cuttlebug using the embossing folders and then altered using alcohol inks, sandpaper and just about anything else.

This is the name badge that I made with this technique.
Happy Crafting
Sonia :-)


Saturday, December 4, 2010

Smooch Inks with Kelsey

On Thursday at Kelsey's ATC class, we all had an opportunity to 'play' with Smooch Inks. A little of this product goes a long way. Yesterday I played even more, when I received some new stamps from Stampotique Stamps.


As you can see, I went a little bit 'nuts' with my old Dragonfly stamp from Stampers Anonymous. I wanted to try several different colour schemes and have added some Martha Stewart micro beads to the corners for highlights as well some Ranger Stickles to add glitter to the wings without interfering with the Smooch colour underneath. (The scans do not do justice to the colours I have used.)

This is the other side of the Dragonfly stamp. (This one is probably my favourite.)


'Moth Fab' is an old stamp I got from Stampotique a while back but the fance is one I received yesterday and thought would add another layer to this piece.


'Weasel with Sign'
Another new Stampotique stamp.
(unfinished)


'Angel Boy'
Another new Stampotique stamp.
(unfinished)


Go to Kelsey's blog to see better examples of this technique.
Happy Crafting.
Sonia :-)

Tuesday, November 9, 2010

Marbled and Crackle ATC's

The last two sessions with Kelsey have been on marbling and metallic crackle.


'Delicious'

The background has been done with the marbling technique using Distress Reinkers in Fired Brick and Black Soot. I have then stamped the background using one of Michelle Ward's stamps.
German scrap with some Treasure Silver and some read pearls complete the piece.


'Attitude'


The background for this is using the metallic crackle backround in Halo Blue Gold (Lumiere) on black card. The gold embellishment at the top is from the cuttlebug range - Wrought Iron. The picture is of silent screen actress Theda Bara.


'Children Need Love'

This has used the same background technique as above. I have used a metallic copper and then dry brushed some Jo Sonja Iridescent Turquiose to give it an aged patina. German scrap, brads and some Cinnamon Stickles add interest and Treasure Copper and more Iridescent Turquoise to the edges, complete the piece.


Happy Crafting
Sonia :-)

Sunday, November 7, 2010

Another Journal Page

It has taken me some time to get this page how I wanted it!! The stem and leaves are a stencil that I have designed and cut out of plastic and used Distress Inks over the top of. The quote is from the 'Quote Garden' website. I have masked the central flower and used green distress ink around it to make it more prominent and to add focus to the overall piece.
Hope you like it.

I have also been working on some more ATC's and will post them in the next few days.

Happy crafting.


Sonia :-)

Thursday, October 14, 2010

Journal

For the past few weeks I've been trying to make some pages for a journal. I have had inspiration from Teesha Moore's blog looking at all the amazing pictures she has made for her new studio in San Francisco. These are my first two attempts. Hope you like them.


Sonia :-)


(Cover)


Wednesday, September 22, 2010

Tile Canvases


'Vintage Memories'
These are the tile canvases that I have been working on over the past week or so. I have taken inspiration from Natalie Wolfe (go to the Scraptivate website to access her blog) who has a wonderful collection of tile canvases on her blog.
For 'Vintage Memories' I have used Collections papers with a Scrapware frame and corner scrolls, as well as Martha Stewart microbeads and several cuttlebug cut-outs.


'Venus'
This uses my favourite picture once again, but this time in a tile arrangement. I have used Jo Sonja's Opal Dust on the frame, which I am really pleased can be seen on the photo. This has also been used on the back of the canvas under the 'tiled' area. The same stamp has been used on the backing as on the frame. The stamped image on the texture paste spread over the frame, has been highlighted using a white marker which I have then softened by wiping back the colour.


This canvas is in black, white, silver and a neutral brown and is very simliar to Natalie's canvas. The torso in the middle has been made using a 'Krafty Ladies' mould and white resin, both available at Scraptivate.


Tomorrow I am off to Kelsey's class on Marbling ..... can't wait for her to show me more amazing techniques.
Happy Crafting
Sonia :-)

Monday, September 20, 2010

Sensational Soot


The previous lesson with Kelsey was the 'Soot' technique. This is a really easy, but very effective technique and I had a lot of fun doing these over the weekend.
The smoke alarms pealed madly and my fingers were all black by the end of the day, but what fun!!
A couple of these need the be finished i.e. named, but I thought I'd post them anyway.


'Solitude'


I will probably name this one 'Castle Moon'


'Elegant'


(The moon in this one is made out of Angelina Fusable film.)


'Moonlit'


'Dream'


'Gothika'


'Awaken'


The past few days I have taken inspiration from Natalie Wolfe's blog and made three tile canvasses. I will post these in the next few days.
Happy Crafting!!
Sonia

Saturday, September 4, 2010

More ATC's

This week I've got back to some ATC's, playing with various techniques.

'Apparition'

This is using Sheer Heaven transfer paper onto a painted background which has been sprayed with black webbing spray. The dark specks at the bottom are Liquitex 'Black Lava' applied with a palette knife.


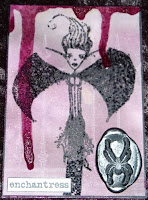
'Enchantress'

This is just a simple ATC, using embossing, soot technique and faux wax.
what is not evident in this photo is that the spider on the faux wax is transparent and when put up to the light, it shows the light through it as I have cut out the ATC backing to allow the light through.


'Arachnoid'

I've had this background sitting in a box for ages and have finally taken the time to make something out of it.
The spider web stamp is one of Tim Holt's over the top of cardstock sprayed with Glimmer Mists and black webbing spray. The spider is the same as for my Enchantress ATC, faux wax.


'Journey'

I have used the 'Bleach' technique on this ATC on black cardstock. The bleach eats away the black pigment to leave an earthy brown tone. I have then used some Tattered Angels Glimmer Glam to paint over the top of the ocean and a white marker to add highlights to the map border.
The title is stamped in fun foam and highlighted with Rub 'n' Buff in Autumn Gold.


'Speak No Evil'

This is another background that I've had for ages in a box. Scrunched tissue paper glued to white cardstock and then sprayed with Glimmer Mists and with a little red paint flicked onto the back for a 'bloody' effect. (hehe!!) The picture has come from a goth website, slightly disturbing but it bought to mind the old saying.


'Song Bird'

This ATC uses Shrink Plastic to create highlights. The title and the bird have been stamped onto shrink plastic and then shrunk using a heat gun. The back ground is white cardstock sprayed with Glimmer Mists and then stamped with a Paper Artsy stamp.


'Artifact'

This ATC has used the Metallic Cardstock technique that I learnt from Kelsey, as well as Shrink Plastic. The stamp is from Michelle Ward.
Enjoy your weekend.
Sonia :-)

Monday, August 30, 2010

Long time between Posts!

I can't believe that it has nearly been a month since my last blog! The past few weeks have been taken up with teaching resin canvases to the lovely ladies in my home town of Corrigin. I was really impressed with the talent of the ladies and they created some beautiful canvases.
I have also been helping sew costumes for my sons school play, which I look forward to seeing on the weekend.

'Venus' is an exaple of the class I took up in the country. This is once again using the reverse side of the canvas and texture past to create the frame. Rather than paint the back of the canvas as in previous posts, I opted for an easier effect of simply using a blown up picture, cut to the same size as the internal void. (This is one of my favourite pictures, Boticelli's 'Birth of Venus'.) This meant less painting and more opportunity to experiment with dry brushing highlights around the edges of the frame using blue and gold. The beads are Mill Hill glass seed and bugle beads and a couple of the glass wiishing stones I kept from out of our old fish tank. (Never throw anything away!!)


'Beauty'
This is one of two tags that I wanted to teach to the ladies, but never had a chance to do. These are the instructions:

Steps:
1. Choose the colours that you wish to use from the Glimmer Mists. Because it is a small area we are working on, I would recommend that you use between 1 – 3 colours.
2. Select a stamp to emboss on the background and choose an embossing colour to complement these.
3. Rub the tag all over with the anit-static powder. Load the stamp with embossing ink and press the stamp into the tag where you want the image to go. Hold the tag over a piece of paper or tray, and sprinkle a generous amount of the embossing powder over the stamped area. Tap the tag gently on the back to dislodge any excess powder.
4. Heat the embossing powder using the heat gun. Angle the heat gun away from you and hold the tag at an angle so that you can see when it changes from matt to gloss. Once it has turned glossy, move the heat to another area so you don’t burn the tag.
5. On a craft sheet (or in our case the piece of plastic taped to the table) spray two colours of Glimmer Mist in a random pattern just bigger than the size of the tag. Take the tag and drop it onto the ink and then ‘smoosh’ it around before peeling it off. The ink will blend and cause rivulets to form and create random patterns on the tag. Dry off using the heat gun avoiding over heating the embossed area you have done first.
6. Using a piece of Blending foam pressed onto the Stazon stamp pad, gently rub over the edges of the tag to give it an aged patina.
7. Select a picture to mount onto chipboard and trim to size using a craft knife, steel ruler and cutting mat. Edge the picture using metallic paint in either gold or silver, depending on the base colour you have used in your background.
8. Using a strip of Grunge Paper, cut the ‘trellis’ or a design of your choosing on the cuttlebug. Ensure that when you put the die in the machine that the foam side is up and the Grunge paper is on the top between the two plastic sheets before operating the machine, as the dies can be damaged if this is done incorrectly.
9. Paint the cut-out using metallic paint to match the border on your picture.
10. Tear out your word and gently rub the edges with Distress ink to match you colour scheme.
11. Glue on the cut-out ‘trellis’, picture, word, German scrap and attach peals or rhinestones.
12. Edge the entire tag in metallic paint the same as around your picture.
13. Your tag is COMPLETE!!


'Not all angels wear wings'
These are the instructions:

Steps:
1. Using the 5cm wide masking tape, cut 3 or four pieces slightly longer than the length of your tag. Tear these lengthways into strips of varying widths. Arrange these onto the tag in layers at intervals, not just working from one side to the other. Once your tag is covered, trim the excess from the edges.
2. Mix Jo Sonja Pearl paint (about the size of a 10 cent piece) with the colour of your choice (I have used Colony Blue) only a small smear as you are using very small quantities. Use the popstick to mix the colours together.
3. Using the rectangular piece of plastic, (pseudo credit card) pick up as much of the paint as you can and starting at one end of the tag and pull the paint over the top. This is just like silk screening with a mini squeegee. If the tag is not covered repeat the process. You will need to watch out for the small ends of the masking tape, as the ‘pulling’ action of the plastic card can loosen them.
4. Whilst this is drying, cut out your picture trying to include as much detail as possible to create interest.
5. When the tag is dry (this can be finished with the heat gun, but be careful not to over heat as the masking tape will blister) rub all over with the anti-static pillow, this stops the embossing powder attaching to places other than the image you want. (Painted surfaces do not take ink well, so embossing is the best way to get an image onto a painted surface.)
6. Select the stamp you want to use and cover with embossing ink. Press the stamp into the tag where you want the image to go. Hold the tag over a piece of paper or tray, and sprinkle a generous amount of the embossing powder over the stamped area. Tap the tag gently on the back to dislodge any excess powder.
7. Heat the embossing powder using the heat gun. Angle the heat gun away from you and hold the tag at an angle so that you can see when it changes from matt to gloss. Once it has turned glossy, move the heat to another area so you don’t burn the tag.
8. Using a piece of Blending foam pressed onto the Stazon stamp pad, gently rub over the edges of the tag to give it an aged patina.
9. Glue on your picture and the small piece of German Scrap to the bottom.
10. Mount your quote onto black card and using Rub ‘n’ Buff highlight the edges in metallic shine on both the words and around the edges of the tag.
11. Glue on the quote.
12. Glue the beaded trim to the back of the tag.
13. To finish, I have glued another tag to the back to hid any paint or other work related mess.
14. Your tag is COMPLETE!


Happy Crafting!! :-)

Tuesday, August 3, 2010

ATCs

Kelsey's Metallic Cardstock lesson was the inspiration for this ATC - "Steam Punk". Using Kelsey's method (go to her blog for instructions, KO...OK?) I have then run the cardstock through the cuttlebug machine using a 'cog' embossing folder. I have then sanded over the top to bring out the embossing. The picture has been mounted onto chipboard and edged with gold before it has been added using tiny screw brads. I have then added the Idea-ology 'Sprockets & Gears as well as two game spinners form the same range. The title is on Metallic tape, which I have stamped using typeset punches.


The next three pictures are of a couple of fun ATCs, dedicated to the HBO series 'True Blood'.

'Erik and Bill' are ATCs that open. Stamped with a new stamp I got from Stampitcrazy on both sides, taking care to try and match up the image, so that the door panels will be seen when the doors open. I have then spritzed with Glimmer Mist in 'Choc Cherries' and then used a white gel pen to add the highlights. I then cut the bottom, centre and part of the way around the top of the doors so that they can be opened. Attaching two small jumper rings with brads has created the door 'handles' and the addition of the crucifix give it a 'goth' feel.


(With the doors shut.)


Happy Crafting :-)